


If setting up a virtual development environment is your goal, here is a guide on how to utilize the vagrant box and virtual machine for this purpose. Let’s discuss the process in detail with this blog.
Here, we will build a vagrant on top of a virtualization engine, as VirtualBox.
Creating the vagrant box
Download VirtualBox and create a directory. You will also need a base operating system. Let’s use ‘ubuntu/trusty64’ for now. Now, we need to initiate the use of the vagrant directory as ‘vagrant init’ and the operating system name.
So, the code would be:
mkdir vagrant_demo --create directory
cd vagrant_demo --enter into the directory
vagrant init ubuntu/trusty64 --initiate vagrant operating system
A VagrantFile, which explains the configuration of the vagrant environment, is created with that last command. Five specs in this file can be modified to suit your requirements. If no modifications are done, the default setup will be used.
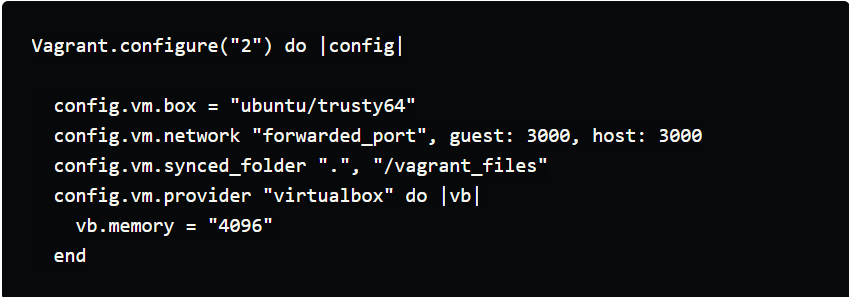
-config.vm.box -- defining vagrant Operating System.
-config.vm.provider -- defining the base (Virtual Machine). With this command, you can also manipulate the number of CPUs used.
-config.vm.network -- defining IP address and ports of application. Rails applications usually default to port 3000. In our case, the host is our computer, and the guest is a virtual machine.
-config.vm.synced.folder -- defining how the guest accesses files in the host. Thus, the project files can be modified on your computer, and then they will be automatically synced to the virtual machine.
-config.vm.provision -- defining the virtual environment setup.
Thus, the final version of our vagrant file is as follows:
Once the vagrant file is created, start and ssh into it to be in a completely active yet isolated OS. Now that the virtual machine and vagrant file are up and running, define and install everything you need for developing your application. In our example, we need to do some installations as below:
install git

install curls

load rvm

install ruby

set default ruby version

verify ruby version

install and check your rails version


install bundler

bundle your gems

install nodejs

install your database.

Make sure to have a properly aligned database.yml file and set the database names in this file. The alignment of this yml file is very important because it can be read wrongly otherwise. Another important factor to consider is the database names. The database names in this yml file should be the database names of your rails application.
Finally, the vagrant environment configuration is complete, and now create your application from scratch.
Creating the application
Creating an application from scratch is done in your local machine and not in a vagrant.
In your local machine, open a new tab in the same directory as your vagrant file.
- Now, to create a new application, run:
rails new your_app_name database = postgresql
- The application is now created. Configure the database with names and permissions, as discussed above.
- Open the terminal where the vagrant is running.
- Move into your synced directory, which is “/vagrant_files” in our example.
- Move into the new app’s directory.
- Run ‘bundle install’.
- Run ‘rails s’ and your app should be up and running at the port or URL as per your definition.
Using the existing application
Open a new terminal in the directory of your vagrant file. Bring the code of your existing app from GitHub.

Now, update the database with proper names.
- Open the terminal where the vagrant is running.
- Move into your synced directory, which is “/vagrant_files” in our example.
- Move into the new app’s directory.
- Run ‘bundle install’.
Run ‘rails s’ and your app should be up and running at the port or URL as per your definition.
Conclusion
At first, the process of creating and setting up a virtual machine and a vagrant box will be tiring. But once tuned in, there is no going back.
There are options to use existing vagrant boxes and also use packers instead of manually doing all the setup. But either way, it is always better to know the logic and working of any predefined schemes for better understanding and easy troubleshooting. So, try out your versions in an above-discussed manner before creating your app. Once you get into the detailed flow, you can skip the basic steps by utilizing predefined packers and move up the ladder for further challenges.
There are chances to replace virtual machines with Docker containers as well. Want to know more about virtual machines and Dockers? Check out our blog post - Docker Vs Virtual Machines Explained.
To deploy and start your Ruby apps on Engine Yard, start your free trial now.
Credits:
Images source: DEV Community
Share with your friends and followers
Start blogging about your favorite technologies, reach more readers and earn rewards!
Join other developers and claim your FAUN account now!


User Popularity
258
Influence
26k
Total Hits
10
Posts
Mentioned tools


Read, Learn, Know, Teach
Hand curated newsletters for Developers, private Slack with like minded people, podcasts, job offers, news and more!

Only registered users can post comments. Please, login or signup.