Join us
@srimal_fernando ・ Jan 10,2022 ・ 7 min read・ 2k views ・ Originally posted on srimalfernando.medium.com


If you’re playing around with multiple technology stacks or extending open-source applications and you don’t mind having to shift back and forth between different languages and frameworks, you might find containerizing your applications useful.
I have found it easier to use Docker to containerize my pet projects for obvious reasons Docker usually poses. But then comes the challenge of making them available outside my workstation. DigitalOcean is a good place to host containerized applications (but you probably already know this since you’re here), and you can do so cheaply if you use a small droplet with about 2GB of memory. That’s enough for personal or small-scale usage of 2–3 applications.
Assigning domains to droplet
You can assign multiple top-level domains or subdomains to a single droplet in DigitalOcean for no additional cost. This can be easily achieved from your droplet’s control panel, as seen below.

DigitalOcean Droplet control panel — add a domain
and then it is as easy as typing in the domain name like below (assuming the domain is already pointed towards your DigitalOcean droplet from your domain’s DNS management portal).

I will not go into the well-known steps of pointing your domain from your registrar to DigitalOcean, but it is as usual and as documented here.
Multiple containers
In this example I will consider two web-apps, one on NodeJs and one on Java-Spark (Jetty server) in each container. Both containers are deployed on Docker in a single droplet with the following ports exposed for simplicity.
NodeJs:
Java-Spark:
I will not be configuring individual servers with SSL thus exposing them only with http. This is because it is easier to apply SSL to the whole configuration once which will be easier to maintain and will avoid double encryption.
If everything went right up to now, you should be able to reach your web applications and use them through following URLs.
Note: For our configuration, we will use a docker network. Therefore we do not need to be concerned about the port mapping between server droplets and the host. What is important is the port your server uses on the container. At the end of the day, we will use the host ports only with a another container, not our development server containers.
Configuration Overview
As I said in the beginning, a small droplet of 2GB memory should be enough to hold up to 2 or 3 containers and be functional, as long as you’re not planning for a production run. Either way, deciding on a droplet is your task and has no bearing on this set-up. Only emphasis is that this configuration will work even in such a small droplet.
We will use NginX in our third container and it will handle the reverse-proxy/ virtual host situation on behalf of our droplet. You can install Nginx in your droplet without Dockerizing it, of course. I prefer to containerize NginX as well so I can move the whole set-up without depending on the droplet too much if I have to. The configuration chapter will cover details of setting up the NginX container.
Our final configuration shall look like below.
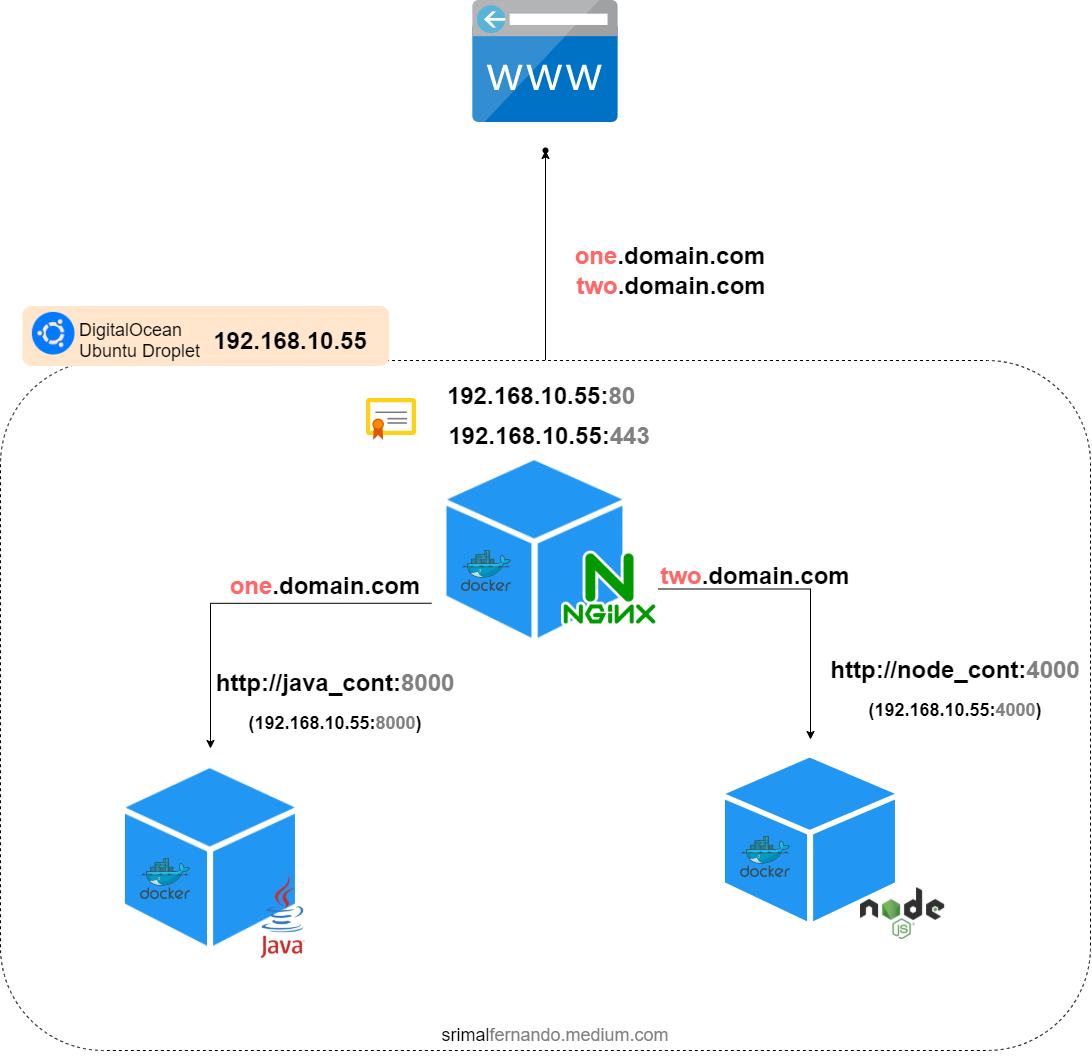
Here, I’m assuming the droplet IP will be 192.168.10.55 for demonstration purposes, but you get the idea. For the NginX container to talk to the other containers by their container name rather than IP/domain name, they all will need to be on the same docker network. Let’s get one set-up.
Creating a Docker Network
Create a Docker Network with any name, in this case I will call it as below:
docker network name: our-network
Make sure all three containers are connected to this network.
Our NginX container need to speak to the other containers. This is why we need a network and all the containers added to it. It doesn’t matter what you decide to call it or if it is an external network or if it is an automatic network created by docker-compose.
You can achieve this with docker-compose like so:
or if you prefer scripts, like so:
That takes care of the communication barrier. We’re ready to set up NginX and configure it.
One config to bring them all — and in the droplet bind them
Configuration will have two parts. Initial configuration is part of the NginX container setup itself. Second will be the custom configuration of NginX.
NginX container
Our NginX container will be spun -up using docker-compose. You can use an alpine based NginX image. But we need more things from NginX, that is, we need SSL for each and every sub container and we want the SSL auto-renewed without administration. It takes more steps to install the necessary packages and scripts to get CERTBOT working on alpine. For the sake of convenience I will use nginx:stable image. But if you have resource constraints on your droplet, I advise using alpine and figure out the CERTBOT and CRON steps manually (at least for the first time).
For the NginX container, we will have a docker-compose.yml file, a Dockerfile inside a directory called ‘nginx’ and then another directory structure within that for nginx configuration.
The directory structure to setup the NginX container must be like so:
nginx/
├─ Dockerfile
├─ config/
│ ├─ conf.d/
│ │ ├─ prod/
│ │ │ ├─ example.conf
docker-compose.yml
note lines marked with ##Change this
The Dockerfile will look like so:
Change the CERTBOT_EMAIL to yours. This receives emails if certificate renew fails or notifications about certificate expiration.
The docker-compose.yml file will look like so:
Note:
Finally, we come to the NginX configuration. (./nginx/config/conf.d/prod/example.conf)
A sample configuration:
Note:
And that concludes the configuration.
To wrap things up, you can add some monitoring set-up on the droplet to make sure you have enough memory and CPU to not run into an app that fails because of not enough resources. I’ll link an article here if I write one.
This set up should self-sustain without any hiccup, I’ve had a slightly bigger setup open to traffic for over 6 months with no maintenance needed.
If you need to change the configuration, simply edit the .conf file and issue a command to the NginX container to reload the configuration.
If you need to add new domains, simply edit the docker-compose file and stop and start the nginx container again, new certificates will be issued.
That is it. Enjoy building cloud applications without spending unnecessarily.
Share with your friends and followers
Join other developers and claim your FAUN account now!
Influence
Total Hits
Posts

Hand curated newsletters for Developers, private Slack with like minded people, podcasts, job offers, news and more!


