


Today I will explain some interesting topic ‘Knative’ — a serverless architecture and how we can utilize it with a simple SpringBoot application. I will not go for all the details about Knative but will focus on a few features of it and how we can simply utilize those features in our application.
Knative serverless environment helps you deploy code to Kubernetes. It gives you the flexibility on no resources are consumed until your service is not used. Basically, your code only runs when it’s consumed. Please see below official link for more details on Knative.
Let’s jump on to the demo so that we will get some real idea. Though you can find several samples, codes on Knative with SpringBoot and Kubernetes. But here I am trying to explain some basic and working examples of Knative with SpringBoot and Kubernetes cluster. Also, trying to touch upon a few interesting features like — ‘Scaling to Zero’, ‘Autoscaling’, ‘Revision’, ‘traffic distribution’ etc.
For real demo purposes, I will use a Spring Boot application that exposes REST API and connects to a mongo database. It’s a very simple application that is deployed on the Kubernetes cluster
Prerequisites:
Since I have used my laptop with Windows 10, so some prerequisites links are related to Windows 10. But some links are generic ones, you can utilize them in your Linux / Mac box. It’s not necessary that you have to use these toolsets for certain prerequisites. You can use your own toolsets as well. If you want to follow the same toolsets which I have mentioned here, then that’s also fine.
Docker Desktop:
Install Docker Desktop on Windows | Docker Documentation
Minikube:
minikube start | minikube (k8s.io)
kubectl cli:
Skaffold cli for automation:
Installing Skaffold | Skaffold
JMeter for load testing:
Apache JMeter — Apache JMeter™
Knative cli on Windows:
Installing the Knative CLI — CLI tools | Serverless | OpenShift Container Platform 4.9
Install Knative Serving on Kubernetes:
Before we start with the SpringBoot application deployed to the K8s cluster and leveraging the Knative features, let’s enable the Knative Serving component in our minikube cluster. There are various ways we can install and configure Knative Serving component in our cluster. Please see the below link for more details.
I have followed the below steps for installing Knative Serving at my end. In this article, I am only focusing on Knative Serving component.
Start Minikube:
(In case there is some issue with an old instance of minikube, you can delete the minikube with ‘minikube delete’ and initiate a fresh cluster with minikube start ).
Open another terminal once the minikube started successfully. Please executes command ‘minikube tunnel’ on that terminal , so that we can be able to use the EXTERNAL-IP for kourier Load Balancer service.
Installation and configuration of Knative Serving:
- Select the version of Knative Serving to install. I am using 1.0.0 version.
2. Install Knative Serving in namespace knative-serving . The below command is required for installing Knative Service CRDs.
Please make sure that all conditions are met for all CRDs.
3. Below command is required for installing Knative Serving cores objects.
Please make sure that all conditions are met.
4. Select the version of Knative Net Kourier to install. I am using version 1.0.0 for this example.
5. Install Knative Layer kourier in namespace kourier-system
Please make sure that all conditions are met.
6. Let’s set the environment variable EXTERNAL_IP to the External IP Address of the Worker Node of your minikube cluster.
7. Let’s set the environment variable KNATIVE_DOMAIN as the DNS domain using nip.io
Please execute the below command in order to check DNS is resolving properly.
8. Next step is to configure DNS for Knative Serving.
9. Now we need to configure Knative to use Kourier.
10. Verify that Knative is Installed properly all pods should be in Running state and our kourier service configured with properly. It should be assigned with an External IP here in my case < 127.0.0.1 >.


Deployment of SpringBoot application to Kubernetes cluster.
We are ready with the environment. Now it’s time to deploy the application and see the actions. We can use Knative CLI (kn) for managing and deploying our applications on Knative. Here in this example, we will use YAML manifest for deployment purposes. But sometimes we leverage the Knative CLI (kn) for checking and managing our Knative services.
Let’s see our Application’s code and how we can deploy that application to K8s cluster using scaffold and leveraging Knative features.
Since I have already mentioned that our application is a simple Spring Boot REST application that has a database connection. For simplicity purpose, we have used Mongo database which is up and running in the sample K8s cluster. Below is the code snippet of our model class. This model class is using ‘employee’ collection in Mongo database.
For DB integration, we are using simple Spring Data MongoDB in our application.
In this example, REST endpoints are exposed only for saving and searching employees. Anybody can enhance the endpoints for other operations like delete, update etc. Below is the controller class associated with endpoints.
Below is the details of ‘application.yaml’ file where we have declared our database connection settings and credentials using environment variables.
Knative service definition:
We have done with the application code snippet. Let’s start with Knative service definition YAML file. It’s the main configuration file where you can define your service definition. You can also define autoscaling strategy, traffics, revisions etc in this configuration file.
Knative Serving provides automatic scaling, or autoscaling, for applications to match incoming demand. This is provided by default using the Knative Pod Autoscaler (KPA). You can achieve the autoscaling by simply using the annotation. Here we have used the annotation ‘autoscaling.knative.dev/target’. We have set the value to 15 ( number of simultaneous requests that can be processed by each replica of an application at any given time). Please see more details on Knative Serving autoscaling at the given link.
We also used Secret and ConfigMap for DB connection details. Since we have used ConfigMap and Secret during our MongoDB deployment to the cluster.
Below is Knative service definition file.
Skaffold configuration for deployment
Here we will use the Skaffold for automation of deployment. Skaffold is a command-line tool that enables continuous development for Kubernetes-native applications. For the build stage, Skaffold supports different tools like Dockerfile, Jib plug-in, Cloud Native Build Packs, etc. In our demo, we will use a simple Dockerfile for the build stage.
Please see below the skaffold.yaml file located at the project root directory. For more details on Skaffold, you can go to the below link.
Below is the Dockerfile for our application and Skaffold will use this Dockerfile for building the container image.
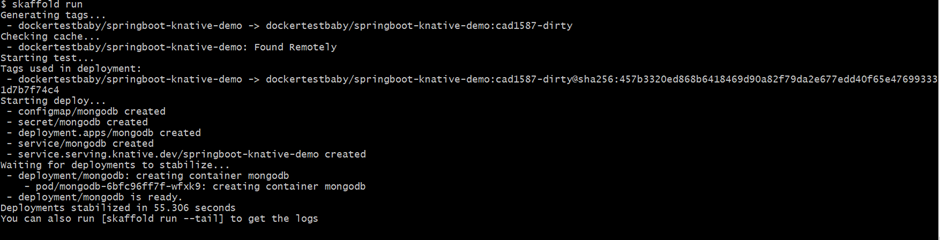
Now we are good to go with the deployment of our application. Let’s execute the command ‘skaffold run’. It will build our application, create and push the Docker Image and finally deploy the application to Knative with help of Knative service definition file.
Verification of the deployment:
It’s time to verify our deployment. Let’s use the Knative CLI for that verification. Please execute the command ‘kn service list’. You can see single Knative Service with the name ‘springboot-knative-demo’.

Let’s create some more revisions of our applications. For that, we need to change our code ( with respect to different revisions ). Here I have created 3 revisions which are pointing to the same Knative service. After making necessary changes to your source codes, you just need to execute ‘skaffold run’. The final source code is already having all the revisions. For our case, you need to start with ‘rev1’, ‘rev2’ and lastly the ‘final’ revision.

Another important feature is to split the traffic between multiple versions. This is very important when you will be dealing with BlueGreen, Canary deployment.
Let’s see how easily we can distribute the traffic among different versions. For that, we need to add ‘traffic’ tag. We can define the percent of load assigned to a specific revision. Here we have assigned 60 percent to final revision, 20 percent to rev2 and 20 percent to rev1. Below is the code snippet.
Let’s achieve Autoscaling and Scaling to Zero:
As we knew that Knative supports the default “concurrency” target of autoscaling, we need to execute some specific load to our service in order to achieve the autoscaling mechanism of Knative Serving.
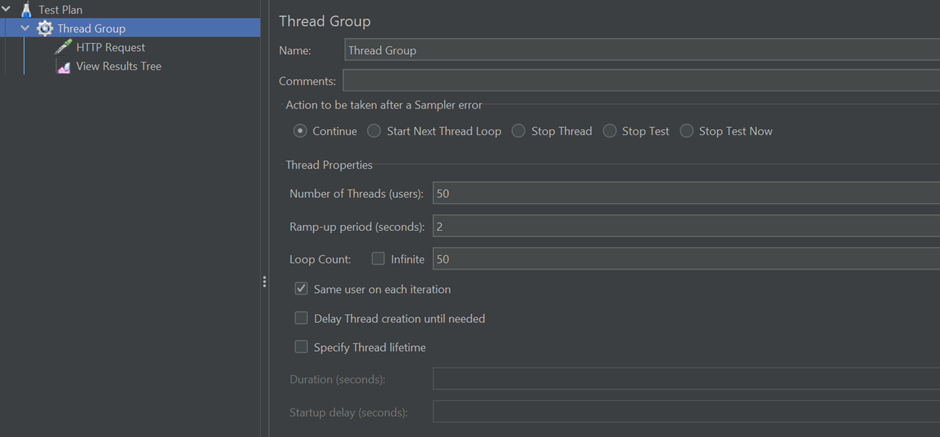
We have set the concurrency target level to 15. To generate a high load/traffic to our service, we can use different load testing tools. Here in this example, we will use JMeter for sending a concurrent request to our service. For example, we are going to send the request using below parameters ( No of Users = 50, Ramp up periods = 2s, Loop Count = 50 ) in JMeter.
For more about JMeter , please see below link:
Apache JMeter — Apache JMeter™
Create a JMeter Test Plan and Thread Group:
Create a simple HTTP Request:
HTTP GET Request with ‘/employee/getAllEmployee’ endpoint.

Execute the Request:
Once we execute the HTTP GET request from JMeter, then at backend we can see due to the Knative Service Autoscaling feature — more pods have been created. For our example –
- 3 pods are running for final revision which is handling 60 percent of traffic.
- 2 pods are running for rev1 revision which is handling 20 percent of traffic.
- 1 pod are running for rev2 revision which is handling 20 percent of traffic.


After sometimes, if you execute the command ‘kubectl get deployments’ , then you can find the READY deployments which are responsible for serving the traffic.

Result:
After successful execution of the above request, the result should be like below.

Great !!! We have checked the autoscaling features very nicely, now let’s explore another beautiful feature. ‘Scaling to Zero’ — one of the most beautiful features of Knative serverless platform/architecture. Let’s see how Knative behaves when there is no traffic coming to the service. You don’t need to worry about that. Knative will detect if there is no traffic coming to service, it will automatically scale down the number of running pods to zero.
Let’s wait for a few mins in an idle state, don’t send any requests to our service. Now you can see pods are in Terminating state.

After a few seconds, you can see there are no pods related to our service running in the cluster.


Clean Up the Deployment:
We are done with the demo. Now, it’s time to clean up the deployment from cluster. Again it’s simple, just run ‘skaffold delete’. It will remove/clean up all the resources from the cluster.

Source Code:
If you are thinking of working code, then here we go.
https://github.com/koushikmgithub/springboot-knative-demo
Wind-up:
Great !!! we have finished the article. Hope you enjoyed it !!!. In this article, I am trying to show how we can deploy Spring Boot application as a Knative service to minikube Kubernetes cluster using Skaffold and Dockerfile. I was also trying to touch on a few interesting features of Knative Serving — like Autoscaling, Scaling to Zero, Distribution of Traffic with simple annotations.
Your comments/suggestions are always welcome !!!.
Share with your friends and followers
Start blogging about your favorite technologies, reach more readers and earn rewards!
Join other developers and claim your FAUN account now!

Koushik Maiti
Architect
@koushikmgithub
User Popularity
40
Influence
4k
Total Hits
1
Posts


Read, Learn, Know, Teach
Hand curated newsletters for Developers, private Slack with like minded people, podcasts, job offers, news and more!

Only registered users can post comments. Please, login or signup.