Join us

Your Guide to Cloning in JIRA: How to Clone Issues in Different Ways

Zrzut ekranu 2025-12-30 142435

TL;DR:

While cloning in Jira can be done in just a few clicks, it becomes less straightforward when you have special requirements. What if you need to clone an issue to a different project, clone tasks in bulk, or do this automatically on a schedule? In this article, we explore all these scenarios and provide you with examples and step-by-step instructions.


The Basics of Cloning in JIRA: What is it and Why is it Useful?

The term refers to the process of duplicating an existing Jira issue (or work item),  resulting in the creation of a new issue with identical details. 

Typically, information such as the issue description, summary, and type is copied to the new issue. Other elements, such as comments or history, are not transferred. The most common reasons for cloning include reusing typical tasks, creating similar issues, or assigning a task to multiple teams.

Benefits of Issue Cloning in Jira:

  • Time optimization – instead of filling in issue details manually, you can re-use the structure from a similar issue. With recurring tasks, cloning significantly boosts efficiency.
  • Linking issues automatically – related or similar issues are linked automatically with the Clones/Cloned by link type. This helps you keep your work in Jira organized.
  • Issue standardization –  when copying, you preserve the issue structure and can use it as a basis for new work items. You will only need to change the details that are different for the new issue.

How to Clone an Issue Within the Same Project 

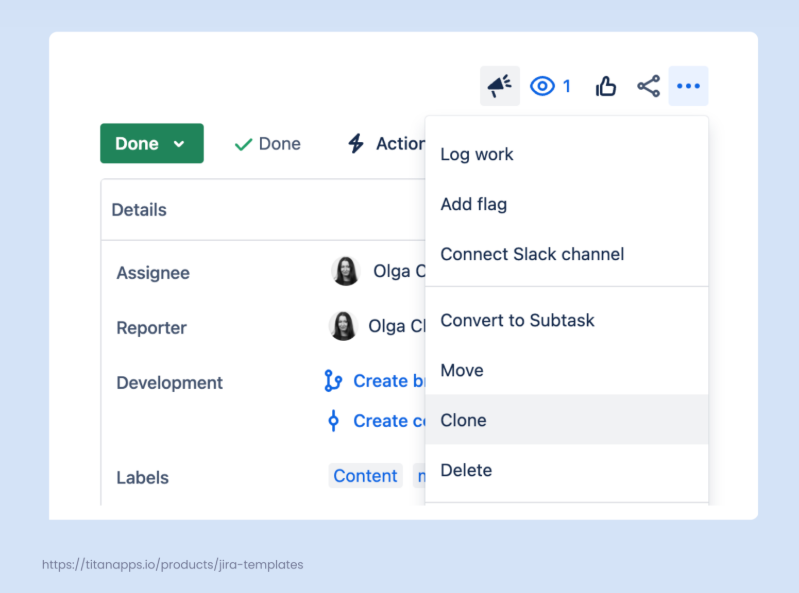
This type of cloning in Jira is quite straightforward. Open the issue you want to clone, click the three dots in the upper right corner, and select Clone. 

In the pop-up window, you will see a list of additional items to include in the cloned issue (if any). In particular, these can be:

  • Attachments
  • Child issues
  • Links
  • Sprint value
  • Custom fields

Depending on your settings, you can also clone an issue directly from your Jira board. To do so, find the card of the issue you want to clone, click the three dots menu, and select Clone.

The cloned issue will be linked to the original task and added to the same project. It will also have the “Cloned” prefix in the summary, unless you edit it out when cloning.

How to Clone a Jira Issue to Another Project

Let’s say, you have a task in one project but need to do similar work in a second project. Another example is when you want to reuse information from a task in a different project. For instance, you have a regression ticket with a QA checklist and linked bugs and you want to clone it to another project as a report for the product manager.

Jira allows you to clone an issue to a different project with the help of a simple automation rule. If such cloning is not needed regularly, it’s best to set up a Jira automation that can be triggered manually. The cloning then occurs automatically. Let’s see how to do this in practice.

  • First, go to Project Settings -> Automation. Click Create Rule.
  • Select Manual trigger from issue as a trigger. Here, you can also specify which user groups can utilize this manual trigger and for which issue types it should be shown.
  • Choose Clone issue as an action. 
  • Next, specify the project for the cloned issue and select the issue type. It can be the same as that of the original issue or a different one (task, subtask, asset, etc.). At this step, you can also remove the “Clone” prefix from the issue summary.
  • Select the fields you want to include in the cloned issue. For example, Assignee, Attachment, Reporter, Description, Linked issues, and so on. 
  • Once ready, enable the rule.

  • Then, go to the issue you want to clone, click Actions, and select Clone issue to another project.

The issue will be cloned to the selected project according to your settings. 

How to Clone a Jira Issue Automatically Based on Conditions

In our previous example, cloning was triggered manually. Now, we’ll see how to set up a flow that is triggered by a specific event instead of a user action.

Let’s say you have a Jira board where your team adds their inputs for your software product. These can be improvement suggestions, ideas for new features, and so on. Later, your product team reviews these suggestions and decides what to implement and what not to implement. When an input is approved, it can be automatically cloned as a task for the development team. 

Here’s an automation scheme for this:

When an issue is transitioned to Approved and the issue type is an Input item, it gets cloned into the specified project as a Story. In this example, we also added the prefix “Input” to the issue summary and a corresponding label for easier tracking. 

You can add different triggers and conditions to the automation rule, depending on your specific situation and requirements. To set it up, go to Project Settings -> Automation -> Create Rule. Once ready, validate and enable your rule.

How to Remove the “CLONE” Prefix From Cloned Issues in Jira

This can be useful when you frequently clone issues automatically and the prefix is not really needed. Go to JIRA Administration -> System -> Advanced Settings. The first entry on the list should be jira.clone.prefix, and the specified value will be “CLONE—.” Click the value text to change or remove it. 

Please note that you need to have Administrator permissions to do this. If that is not the case, you can adjust the prefix directly in the automation rules you use by editing the issue summary field.

How to Clone a Jira Epic With All Its Tasks and Subtasks  

Currently, Jira does not offer an out-of-the-box option to clone the whole hierarchy of issues within an epic. Here are the alternatives you can consider:

Use Smart Templates for Jira to clone the whole hierarchy

With the help of this app, you can save an epic and all its issues, subtasks, and checklists as a reusable template. From that template, you can create an exact duplicate of the original epic. This allows you to clone an epic both to the same project or to another one.

Clone an epic manually from the issue view page

In this case, an epic and its issues will be cloned into the same project, but subtasks and checklists will not be copied.

Use Automation for Jira to clone an epic with its issues

You can set up a rule that will clone an epic and the issues it includes to the same or to another project. However, subtasks and checklists will not be transferred. The available workarounds for including subtasks often don’t work reliably due to Jira’s limitations.

If you're enjoying learning about cloning in Jira, read the whole article written by Olga Cheban and originally published on TitanApps blog.


Let's keep in touch!

Stay updated with my latest posts and news. I share insights, updates, and exclusive content.

Unsubscribe anytime. By subscribing, you share your email with @viktoriiagolovtseva and accept our Terms & Privacy.

Give a Pawfive to this post!


Only registered users can post comments. Please, login or signup.

Start writing about what excites you in tech — connect with developers, grow your voice, and get rewarded.

Join other developers and claim your FAUN.dev() account now!

Avatar

Viktoriia Golovtseva

@viktoriiagolovtseva
Experienced Content Writer & Marketer, passionate about crafting strategic content that drives results and exploring the intersections of content and product marketing to create impactful campaigns.
Developer Influence
54

Influence

5k

Total Hits

23

Posts