Join us

How to Plan a Product Release in Jira

Zrzut ekranu 2026-01-20 123937

TL;DR:

From the Release Hub and backlog management to automated release notes, Jira has plenty of tools to help you plan your next release. In this blog post, we explain how to use these tools effectively for different release types. You will also get practical tips for extending the native Jira release planning capabilities with additional apps. Let’s dive in!


What is a Product Release and Why Plan it in Jira?

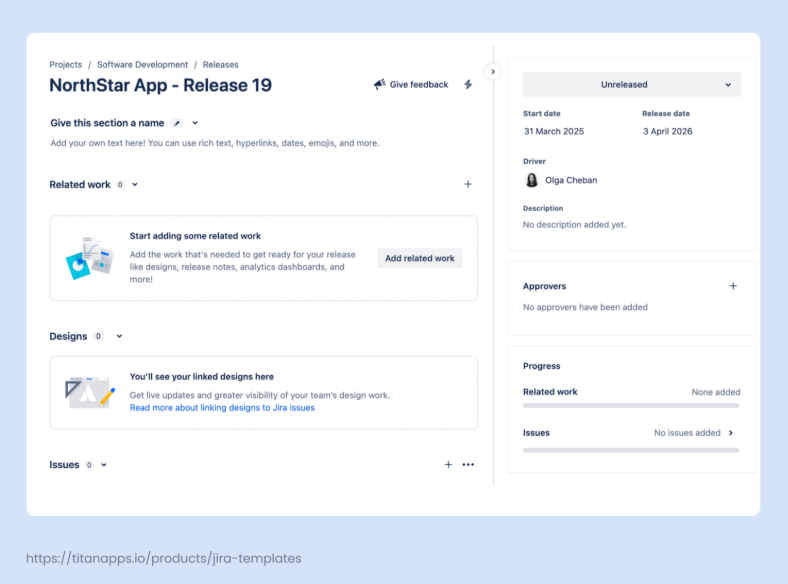
A product release is the process of deploying new or updated code to the production environment, making new functionality available for end users. A release results from multiple related processes, such as research, design, development, testing, documenting new features, and so on. In the context of Jia, a release, or fix version, represents a scope of functionality that will be deployed and is organized as a set of work items. As teams typically follow an incremental approach to software development, product releases often combine multiple updates and serve as clear milestones.

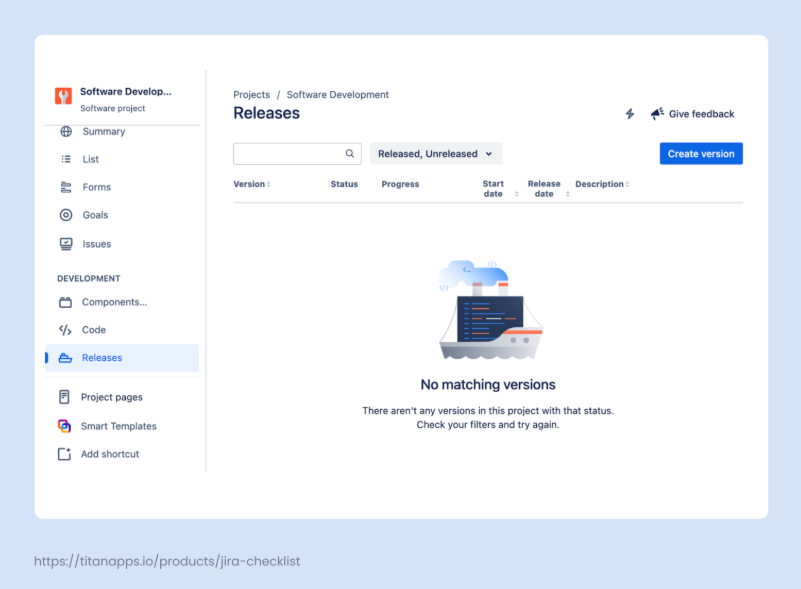
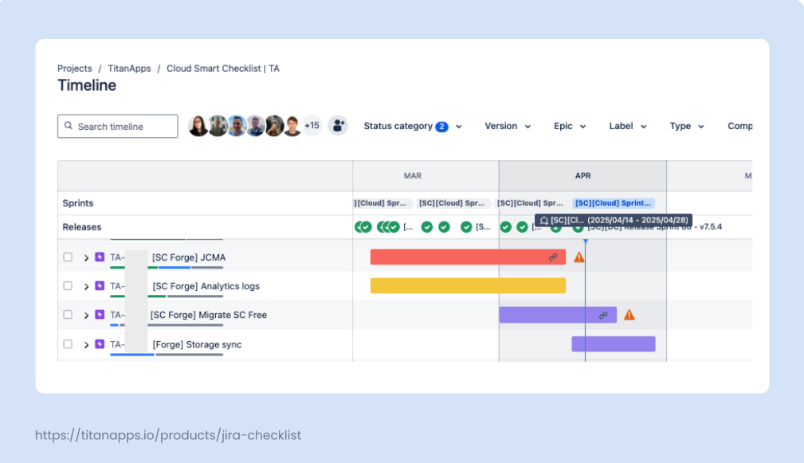
Jira is a popular choice for managing the product release cycle. It offers many tools for planning, allowing you to organize work at multiple levels and from various angles. A backlog, epics, sprints, and releases (also called versions) are all examples of such tools. Each of them addresses different needs and serves different goals. 

Jira release planning, in particular, is crucial for understanding when something will be ready and when it will be deployed to production. Utilizing it effectively helps you plan delivery, manage resources, and communicate with stakeholders transparently.

The Main Approaches to Jira Release Planning

There are different ways to organize releases in Jira, depending on your team’s approach to software development. Here are the main release models:

  • Feature-based: Releases are tied to completing work on specific features rather than a pre-defined time frame. A release is shipped when the planned features are ready.
  • Continuous: As soon as a portion of work is completed, it’s deployed without delay. With this approach, there’s no need to wait for the rest of the scope to be ready. So, instead of one large release, there are continuous smaller updates.
  • Agile/Scrum: This implies a sprint-based approach, where a team has a specific scope planned for the sprint. Typically, a sprint is a two-week period, but the duration can vary depending on the specific process. At the end of each sprint, this scope should be completed and deployed to production. As a result, in this model, releases occur bi-weekly.

These approaches don’t always exist separately. In practice, many teams blend them, flexibly adapting different formats to their needs. For example, you can plan a feature release but deliver it partially in sprints. Another example is when you work with the Agile/Scrum model, but deliver continuously.

Planning a Feature-Based Product Release in Jira Step-By-Step

As I mentioned earlier, this type of release focuses on shipping a specific feature or features. Such a release demonstrates more obvious value to users and stakeholders compared to releases that don’t roll out a complete feature. One of the advantages of this approach is improved prioritization and flexibility in deadlines. 

Another important benefit is enhanced cross-department alignment. When a product team plans to release a specific feature all at once, rather than in increments, the support and marketing teams can better prepare for the launch.

Please note that, in terms of release management tools, Jira is optimized to work best with company-managed software projects. Team-managed projects don’t have a Releases page or another dedicated space for creating and managing fix versions. They also don’t have the Release Notes feature. The automation options are limited as well, as the number of available triggers is smaller compared to a company-managed project. For more details on selecting a project type, please refer to our Jira Setup Guide.

1. Decide How to Structure Your Release

To plan a feature-based release, product managers can use epics and fix versions in Jira. For example, our team is currently developing a new feature, multiple checklists, for our app Smart Checklist for Jira. This work is organized into multiple epics, which are included in the same release in Jira. When bugs are discovered during the testing stage, it’s important to add them to the release as well. 

The estimated timeframe for completing all tasks is 3 months. Once all the work items within this scope are finished, everything will be shipped at once. For smaller features, there might only be 2-3 stories added to a Jira release, with a tentative due date set in advance.

Sometimes, it’s convenient to split a release into several fix versions to deliver the feature incrementally. Then, you can decide in advance which tasks will be included into fix version 1, 2, or 3 and assign them accordingly.

Once you have decided on the structure of your release, it’s time to start organizing it in Jira.

2. Create a Release in Your Jira Project

Let’s add a release to your company-managed Jira project. In the project menu on the left pane, you will find Releases. In Jira, Releases are also called versions or fix versions. Click Create version to add one.

Then, name the version and specify the start date and release date, if you have a clear timeframe. When naming the release, decide on a clear naming convention to avoid confusion. For a feature-based release, it makes sense to include both the feature name and the release number. For example: “Smart Checklist – Multiple checklists – V1”.

After creating a release, fill out the necessary information following the tips in the placeholders:

On this page, you can add a release description and any related materials that can be useful for the team when working on the release. In particular, consider including such items as:

Basically, the added assets can be anything you need. It’s enough to provide the URL and description for the item you want to include.

Apart from that, Jira allows you to link designs from Figma and preview them in the release hub and in work items. You will need to install the Figma for Jira app to enable this integration. The app is free, but you are required to have a paid Figma plan to connect your designs to Jira.

There’s also a dedicated section where you can add approvers for the release. This is especially convenient when you need a “green light” from multiple stakeholders. The section will list all your approvers along with the approval status from each person (Approved, Declined, or Pending):

All this information can be edited by anyone who has the Administer projects permission. This page is called the release hub. Here, you can see how much work has been completed in your fix version and check the status of Jira work items.

The release we’ve just created is called a single-project release. If you are a user of Jira Premium, Enterprise, or Jira Data Center, you can also create a cross-project release. The latter allows you to monitor and manage multiple releases from different teams and projects in one place as a single release.

Pro tip: Fix versions can also be created with Automation for Jira. For example, every month or when a previous version has been released. You can specify the start and end dates for the release, the version name, and the project where you want to create it.

3. Add Work Items to Your Release 

The next step is to add Jira work items (also known as Jira issues) to the release. These can be epics, stories, tasks, bugs, and any other work items in your backlog. 

This can be done in different ways:

  • Adding work items from the Release page. To do this, open your release view and click +Add issues in the Issues section at the bottom:

Then, you will see a pop-up window with the search bar. Search for the work items you need by keywords in their summary or by their work item key (the number at the beginning of the work item name). You can also simply select work items from the dropdown menu:

  • Dragging work items from the backlog. This is helpful when you have many tasks to add and searching for them all would be inconvenient. Open your backlog and click Version -> Show version panel. Your versions, or releases, will appear in the panel on the left. Then, simply drag a work item to the area on the panel corresponding to the selected version, and it will be added to that version/release.

  • Using the Fix Versions field is another way to add work items to a release. Open a Jira work item and simply assign it to a specific release in the Fix Versions field. If you have a company-managed project, you can bulk edit fields for multiple work items in the backlog. To do so, open your backlog and then press and hold Ctrl (Windows) or Cmd (Mac). Select several work items, and you will see a menu for bulk editing at the bottom of the page. Select the release you need for the Fix Versions field and save the changes. 

For advanced scenarios, use Automation for Jira or bulk change from JQL. 

Later, it’s important to add the discovered bugs to the release. It’s essential to see them in the scope and ensure they are fixed before shipping the release.

When the work items are added, you can view them from the release page:

4. Track Release Progress with the Release Hub and Jira Timeline

To access the release hub, navigate to Project menu -> Releases. This is the page where you created your first fix version. When you have more of them, you’ll be able to monitor their status here. 

This page provides a breakdown of how many work items have the Done status and how many are In progress or To do. This allows you to estimate the delivery pace, identify blockers on time, and, if necessary, make an informed decision about altering the release scope. 

If you connected your development tools to Jira, you will be able to see additional information related to your work items: commits, builds, deployments, and so on.

To track the progress of several releases, you can use the Timeline view. If they are not shown in this view by default, go to Timeline -> View settings -> toggle on Releases. 

Jira has color-coding that allows you to see the status of your releases on the timeline at a glance. A green circle next to the release name means the release has already been shipped. A blue dot indicates it’s in progress, and a red dot signals that the release is behind schedule.

If this article caught your attention and you want to learn more about Jira release planning, read the full version written by Olga Cheban and published on the TitanAppsblog.


Let's keep in touch!

Stay updated with my latest posts and news. I share insights, updates, and exclusive content.

Unsubscribe anytime. By subscribing, you share your email with @viktoriiagolovtseva and accept our Terms & Privacy.

Give a Pawfive to this post!


Only registered users can post comments. Please, login or signup.

Start writing about what excites you in tech — connect with developers, grow your voice, and get rewarded.

Join other developers and claim your FAUN.dev() account now!

Avatar

Viktoriia Golovtseva

@viktoriiagolovtseva
Experienced Content Writer & Marketer, passionate about crafting strategic content that drives results and exploring the intersections of content and product marketing to create impactful campaigns.
Developer Influence
54

Influence

5k

Total Hits

26

Posts