


Continuous Integration is one of the renowned mantras in the DevOps + agile environment. It is a DevOps practice where developers/engineers regularly merge their code changes into a central repository, and it is built and tested automatically.
Continuous Integration is one of the renowned mantras in the DevOps + agile environment. It is a DevOps practice where developers/engineers regularly merge their code changes into a central repository, and it is built and tested automatically.
Benefits of continuous integration:
- Prevent integration errors
- Committing code frequently
- Continuous feedback mechanisms
- Catch bugs early
- and many more
Tools for continuous integration:
There are many tools for CI. Some of the popular tools are:
- Jenkins
- Bitbucket Pipelines
- AWS CodePipeline
- CircleCI
- GitHub Actions
As a part of my DevOps learning journey, I came across GitHub actions and I am happy to share my understanding of them here.
GitHub actions:
It is a continuous integration and continuous delivery (CI/CD) platform that automates the build, test and deployment phases. It goes beyond the standard CI process and allows you to configure the workflows such as automated labelling for new issues created in the repository. This workflow can be executed in a GitHub-hosted environment called runners or self-hosted runners. It supports Windows, Linux and macOS virtual environments.
Components of GitHub actions:
- Workflows: Configurable automated process defined in a YAML file, that can execute one or more jobs
- Events: Activity in the repository that can trigger the workflow execution
- Jobs: Set of steps to execute as a part of a workflow
- Actions: Custom applications that are combined to create jobs
- Runners: Servers that run the workflows when triggered

Enough theory, let’s play!
Before getting into this, please brush up on the basic concepts of Node.js, unit testing and git.
Setting up Node.js Application:
- Create src/app.js
2. Create src/index.js
3. Add test file — src/app.test.js
4. Add scripts section in package.json
Setting up GitHub Actions:
- Create a new GitHub repository or you can use the existing repository if you have one
- Create a directory .github/workflows in the repository to store the workflow configuration file
- Create a YAML configuration file under the workflows directory
Let’s do a deep dive into the workflow configuration
- name: defines the name of the workflow — Node.js CI
- on: defines events that cause the workflow to trigger — we configured push and pull_request events and the branch to watch
- jobs: defines a job — we configured a job named build
- runs-on: defines the runner OS — ubuntu-latest
- steps: a set of steps to perform for the job
- uses: checkout action checks-out your repository under $GITHUB_WORKSPACE and setup-node action installs node.js environment
Now we have the initial setup ready.
Steps to test the workflow:
1.Make some changes anywhere in the app.js file (Ex: console.log())
2. Commit and push the changes to your repository. Since we configured the push event in our workflow, it will be triggered automatically
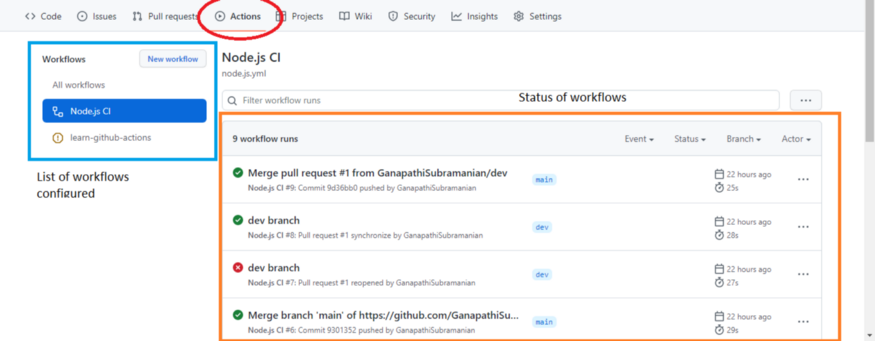
3. Check the Actions tab from the GitHub page to get the status of workflows
4. Optional — You can try to create a new branch from the main branch, make some changes and then merge it back to the main branch to test the pull_request event
Summary:
We have discussed the basics of GitHub actions. But this is not the end, based on the requirement of the project, you can also configure the following items,
- Various events and actions
- Multiple workflows
- Using self-hosted runners
- and many more…
To learn more, please check out the official documentation — GitHub Actions Documentation — GitHub Docs
Repository reference — GanapathiSubramanian/githubActions
Thank you for your time. Happy learning :)
Share with your friends and followers
Start blogging about your favorite technologies, reach more readers and earn rewards!
Join other developers and claim your FAUN account now!


User Popularity
44
Influence
4k
Total Hits
2
Posts

Read, Learn, Know, Teach
Hand curated newsletters for Developers, private Slack with like minded people, podcasts, job offers, news and more!

Only registered users can post comments. Please, login or signup.