Join us

Airflow High Available cluster - 2

Apache Airflow

Part 2

Implementing the Airflow HA solution

For simplifying installing process, I will perform all actions under root. You should use a non-privileged user with sudo for installing. We’ll skip this question as well as many security aspects.

1.1 Installing etcd and patroni

Let’s start the installation process by installing the PostgreSQL cluster with Patroni.

Prepare a node for installing necessary packages:

                # apt-get update
# apt-get -y install ntp python3.8 python3-pip python3-apt unzip
            

Configure your timezone:

                # dpkg-reconfigure tzdata
            

Then install etcd from Ubuntu’s repos:

                # apt-get -y install etcd
            

Then install patroni itself:

                # pip3 install patroni python-etcd psycopg2-binary
            

1.2 Installing PostgreSQL from the official repository

Installing PostgreSQL from the official repo allows us to install the latest stable version.

Just follow the instructions from the official website:

                # sh -c 'echo "deb http://apt.postgresql.org/pub/repos/apt $(lsb_release -cs)-pgdg main" > /etc/apt/sources.list.d/pgdg.list'
# wget -quiet -O -https://www.postgresql.org/media/keys/ACCC4CF8.asc | sudo apt-key add -
# apt-get update
# apt-get -y install postgresql
            

Remove all PostgreSQL data, installed from repository, because patroni cluster will create its own configs and databases:

                # systemctl stop postgresql
# rm -rf /var/lib/postgresql/13/main/
            

Disable postgresql service, since the cluster will be started by patroni:

                # systemctl disable postresql
            

1.3 Configuring patroni, etcd, and PostgreSQL

Here is an etcd config template:

                # cat /etc/default/etcd.yaml
name: 'node1'
data-dir: /var/lib/etcd/default
listen-peer-urls: http://10.5.0.4:2380
listen-client-urls: http://10.5.0.4:2379,http://127.0.0.1:2379
initial-advertise-peer-urls: http://10.5.0.4:2380
initial-cluster: node1=http://10.5.0.4:2380,node2=http://10.5.0.2:2380,node3=http://10.5.0.3:2380
initial-cluster-state: 'new'
advertise-client-urls: http://10.5.0.4:2379
log-outputs: [stderr]
log-level: debug
initial-cluster-token: 'etcd-external-cluster'
            

Just replace names and IP addresses with yours.

Then, take the following Patroni config and modify it with your data(please bear in mind it’s YAML and you should use the right indents):

                # cat /etc/patroni.yml
scope: postgres
name: node1
restapi:
   listen: 10.5.0.4:8000
   connect_address: 10.5.0.4:8000
   certfile: /etc/ssl/certs/ssl-cert-snakeoil.pem
   keyfile: /etc/ssl/private/ssl-cert-snakeoil.key
etcd:
   protocol: http
   hosts: 10.5.0.3:2379,10.5.0.4:2379,10.5.0.2:2379
bootstrap:
 dcs:
   ttl: 100
   loop_wait: 10
   retry_timeout: 10
   maximum_lag_on_failover: 1048576
   postgresql:
     use_pg_rewind: true
     use_slots: true
     parameters:
        wal_level: hot_standby
        hot_standby: true
        wal_keep_segments: 8
        max_wal_senders: 10
        max_replication_slots: 5
        checkpoint_timeout: 30
 initdb:
  - encoding: UTF8
  - data-checksums
users:
  admin:
    password: ifHefshio
    options:
       - createrole
       - createdb
  replicator:
    password: ifHefshio
    options:
       - replication
postgresql:
   listen: 0.0.0.0:5432
   connect_address: 10.5.0.4:5432
   data_dir: /var/lib/postgresql/13/main/
   config_dir: /etc/postgresql/13/main/
   bin_dir: /usr/lib/postgresql/13/bin
   pgpass: /tmp/pgpass
   authentication:
       replication:
           username: replicator
           password: ifHefshio
       superuser:
           username: admin
           password: ifHefshio
   parameters:
       unix_socket_directories: '/var/run/postgresql/'
       stats_temp_directory: '/var/run/postgresql/13-main.pg_stat_tmp'
tags:
    nofailover: false
    noloadbalance: false
    clonefrom: false
    nosync: false
log:
    dir: /var/log/postgresql
    level: INFO
            

Further, we need to allow connecting to our PostgreSQL instances from the local network:

                # vi /etc/postgresql/13/main/pg_hba.conf
            

I added the following two strings:

                host replication replicator 10.5.0.0/24 md5
host all all 10.5.0.0/24 md5
            

The lines above permit connection any of the PostgreSQL nodes from the local network. If you are not going to connect directly to the node, you can leave only a load balancer IP address.

Now the time has come to add systemd units for etcd and patroni:

                # cat /lib/systemd/system/etcd.service

[Unit]
Description=etcd - highly-available key value store
Documentation=https://github.com/coreos/etcd
Documentation=man:etcd
After=network.target
Wants=network-online.target

[Service]
Type=notify
User=etcd
PermissionsStartOnly=true
ExecStart=/usr/bin/etcd --config-file /etc/default/etcd.yaml
Restart=on-abnormal
#RestartSec=10s
LimitNOFILE=65536

[Install]
WantedBy=multi-user.targetAlias=etcd2.service
            
                # cat /lib/systemd/system/patroni.service

[Unit]
Description=Runners to orchestrate a high-availability PostgreSQL
After=syslog.target network.target etcd.service
Requires=etcd.service

[Service]
Type=simple
User=postgres
Group=postgres
ExecStart=/usr/local/bin/patroni /etc/patroni.yml
KillMode=process
TimeoutSec=30
Restart=no

[Install]
WantedBy=multi-user.target
            

You should enable these two services.

Note. As you have to install at least three nodes, there is a convenient way to install and configure the patroni cluster is to create an Ansible playbook(or use something similar).

Note. Pay attention, patroni depends on etcd, if etcd fails at the start, patroni also won’t be launched. Occasionally, it’s useful to avoid starting patroni on a specific node to perform some manual actions like database recovery. Take it into account!

1.4 Start PostgreSQL cluster with Patroni

First of all, service etcd should be running before starting Patroni, which will start PostgreSQL.

Start it:

                # systemctl start etcd
            

The action above should be done on all three nodes

Let’s check if the etcd cluster is up:

                root@node1:~# etcdctl cluster-health
member e65bd2725f0955f is healthy: got healthy result from http://10.5.0.4:2379
member 2b6d6c9d377f653a is healthy: got healthy result from http://10.5.0.2:2379
member c496e9114bd232df is healthy: got healthy result from http://10.5.0.3:2379
cluster is healthy
            

If you got something like that, it means the etcd cluster has been built and running.

Master election and other cluster algorithms are implemented in etcd, and patroni relies on it.

To see which node is master, type in a console:

                root@node1:~# etcdctl member list
e65bd2725f0955f: name=node1 peerURLs=http://10.5.0.4:2380 clientURLs=http://10.5.0.4:2379 isLeader=false
2b6d6c9d377f653a: name=node2 peerURLs=http://10.5.0.2:2380 clientURLs=http://10.5.0.2:2379 isLeader=true
c496e9114bd232df: name=node3 peerURLs=http://10.5.0.3:2380 clientURLs=http://10.5.0.3:2379 isLeader=false
            

The next step is to start Patroni with PostgreSQL. When patroni is being launched, it automatically starts PostgreSQL, which in its turn, initializes the database, then patroni creates users specified in config, replaces pg_hba.conf file, postgresql.conf is renamed to postgresql.base.conf and finally, patroni adds postgresql.conf file with specific settings and with including postgresql.base.conf.

Therefore, if you need to change some of the PostgreSQL settings, let’s say timezone, you should modify postgresql.base.conf file.

                # systemctl start patroni
            

Do it on all nodes!

Let’s check if PostgreSQL is up:

                # systemctl status patroni
            

You’ll see patroni process like:

                471 /usr/bin/python3 /usr/local/bin/patroni /etc/patroni/patroni.yml
            

Moreover, you should see PostgreSQL processes.

Okay, it’s about the process, but how to check if the database cluster is working properly?

There is a command-line interface to patroni:

                root@node1:~# patronictl -c /etc/patroni.yml list
+ Cluster: postgres (6987392780241750765) ------+----+-----------+
| Member      | Host        | Role    | State   | TL | Lag in MB |
+-------------+-------------+---------+---------+----+-----------+
| node1       | 10.5.0.4    | Leader  | running | 17 |         0 |
| node2       | 10.5.0.2    | Replica | running | 17 |         0 |
| node3       | 10.5.0.3    | Replica | running | 17 |           |
+-------------+-------------+---------+---------+----+-----------+
            

This utility is used for cluster managing (switchover, failover, etc) too. I won’t consider this.

1.5 Load balancer

One of the requirements is to use an HA load balancer. Usually, cloud providers supply load balancers and guarantee high availability.

During creating a load balancer what you should pay attention to:

  1. Service. Choose TCP service and specify ports 5432
  2. Health check. Choose HTTP, port 80, specify URL as/master fill in the response code field by 200.

Attach your LB to the local network, chosen targets should be your three nodes.

I’ll provide a few screenshots from Hetzner, other providers have the same settings, and interfaces look similar(AWS,GCP, etc).

Hetzner Load balancer services

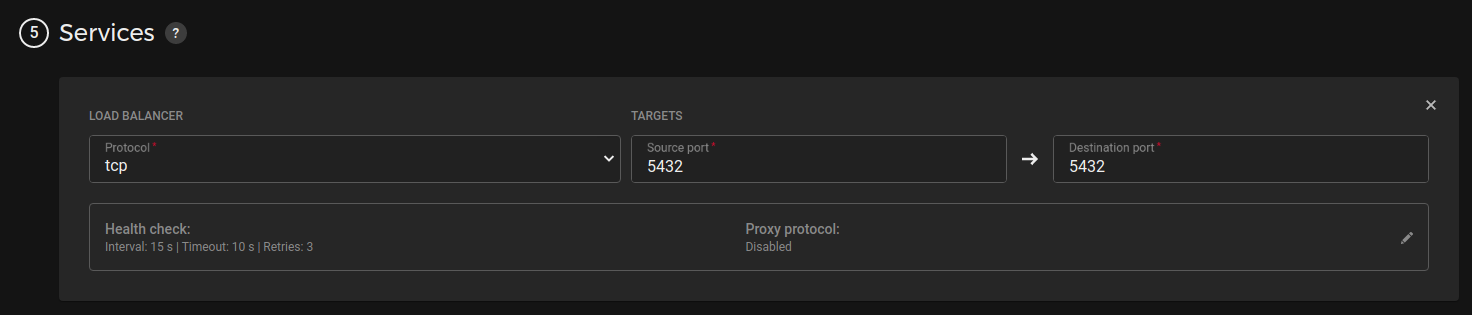
Pic 1. Load balancer services settings

Hetzner Load balancer health check settings

Pic 2. Load balancer health check settings

Test your patroni cluster:

                # psql -U admin -h 10.5.0.10 -W -d postgres
            

Where 10.5.0.10 is the load balancer’s IP address.

Admin’s password you can find in patroni config.

Create a user and database for airflow:

                psql> CREATE DATABASE airflow;
psql> CREATE USER airflow WITH PASSWORD 'airflow';
psql> GRANT ALL PRIVILEGES ON DATABASE airflow TO airflow;
            

1.6 Celery

Celery can be installed from OS packages and from pip repository. A preferred approach is to install using pip:

                # pip3 install celery
            

You should install celery on all nodes.

Installed package no need to be configured.

1.7 RabbitMQ

To install RabbitMQ type in a console the following(on three nodes):

                # apt-get -y install rabbitmq-server
            

Then enable systemd unit:

                # systemctl enable rabbitmq-server.service
            

and start it:

                # systemctl start rabbitmq-server.service
            

Then we need to configure the RabbitMQ cluster.

To configure the broker we’ll use CLI.

The following actions should be done on one node, say on node1:

                # rabbitmqctl add_user airflow cafyilevyeHa
# rabbitmqctl set_user_tags airflow administrator
# rabbitmqctl add_vhost /
# rabbitmqctl set_permissions -p / airflow ".*" ".*" ".*"
# rabbitmqctl delete_user guest
            

where airflow is the user and cafyilevyeHa is its password

Now, let’s create the RabbitMQ cluster.

It’s important to add all nodes to /etc/hosts file:

                10.5.0.4 node1
10.5.0.2 node2
10.5.0.3 node3
            

Firstly, we need to activate ssh passwordless access between cluster nodes:

generate ssh keys and put them into authorized_keys files on all three nodes.

You can use once generated keys.

Copy cookies from any node to others(in the example below we use node1):

                # scp /var/lib/rabbitmq/.erlang.cookie root@node2:/var/lib/rabbitmq/
# scp /var/lib/rabbitmq/.erlang.cookie root@node3:/var/lib/rabbitmq/
            

Cookies are used for authentication.

Check if nodes are working independently:

sequentially enter the command below to check the status of the cluster, you’ll see the cluster is not created:

                # rabbitmqctl cluster_status
            

After checking prerequisites, it’s time to add nodes to the cluster.

It’s necessary to perform the actions on node2 and node3:

                # rabbitmqctl stop_app
# rabbitmqctl reset
# rabbitmqctl join_cluster rabbit@node1
# rabbitmqctl start_app
            

When the cluster has been created, you can check its status:

                # rabbitmqctl cluster_status
            

As you’ve created the cluster, you’ll see something like this:

                root@node1:~# rabbitmqctl cluster_status
Cluster status of node rabbit@node1 …
Basics
Cluster name: rabbit@node1
Disk Nodes
rabbit@node1
rabbit@node2
rabbit@node3
Running Nodes
rabbit@node1
rabbit@node2
rabbit@node3
Versions
rabbit@node1: RabbitMQ 3.8.2 on Erlang 22.2.7
rabbit@node2: RabbitMQ 3.8.2 on Erlang 22.2.7
rabbit@node3: RabbitMQ 3.8.2 on Erlang 22.2.7
            

Also, there is a possibility to check the status in the web interface, create an ssh tunnel:

                # ssh <ipaddress-node1> -L 15672:localhost:15672
            

In your browser’s address line insert http://localhost:15672

You’ll see the state of the cluster and nodes.

Note. There is a way to enable peers auto-discovery, but it’s not the scope of the article.

See you in the third part of the tutorial.


Only registered users can post comments. Please, login or signup.

Start blogging about your favorite technologies, reach more readers and earn rewards!

Join other developers and claim your FAUN account now!

Avatar

Denis Matveev

sysadmin/devops, Ignitia AB

@denismatveev
I am an IT professional with 15 years experience. I have a really strong background in system administration and programming.
User Popularity
71

Influence

6k

Total Hits

3

Posts