Join us

How to Make Your Jira Sprint Planning Really Agile

Zrzut ekranu 2026-04-29 152303

You know the drill: build a product roadmap in Jira, create your product backlog, review it, update the user stories, come up with a sprint goal before the meeting, and finally, review every story to decide which ones need to be completed this sprint.

Easier said than done, right?

Well-planned sprints are what make a great agile dev team even greater and more robust. The better you plan your work, the more likely you are to meet your goals and deliver results on time. In this article, we will explain how to make your sprint planning in Jira as agile as it gets.

But First, What Are Sprints and What Are Sprint Plannings For?

A sprint is a time-boxed period during which a “Done”, usable, and potentially releasable product increment is created. Typically, a sprint lasts between 2 and 4 weeks.

The next sprint starts immediately after the conclusion of the previous sprint. The goal of Jira sprint planning is to define what is crucial to shipping better software faster, minimizing the risk of unwanted surprises and ensuring code quality.

In practice, sprints also serve the purpose of aligning the development team with the PO (product owner). A sprint planning session creates a common ground for the team. This is where you can communicate the expectations and priorities, discuss concerns, and agree on next steps. How can you do this properly? To answer that question, let’s explore how to create a sprint in Jira in the first place.

How to Plan, Create, and Run a Really Agile Sprint in Jira Software?

Here’s a step-by-step guide, enhanced with pro tips, on how to create a truly agile Sprint that follows Jira best practices:

Jira Sprint Planning Meeting

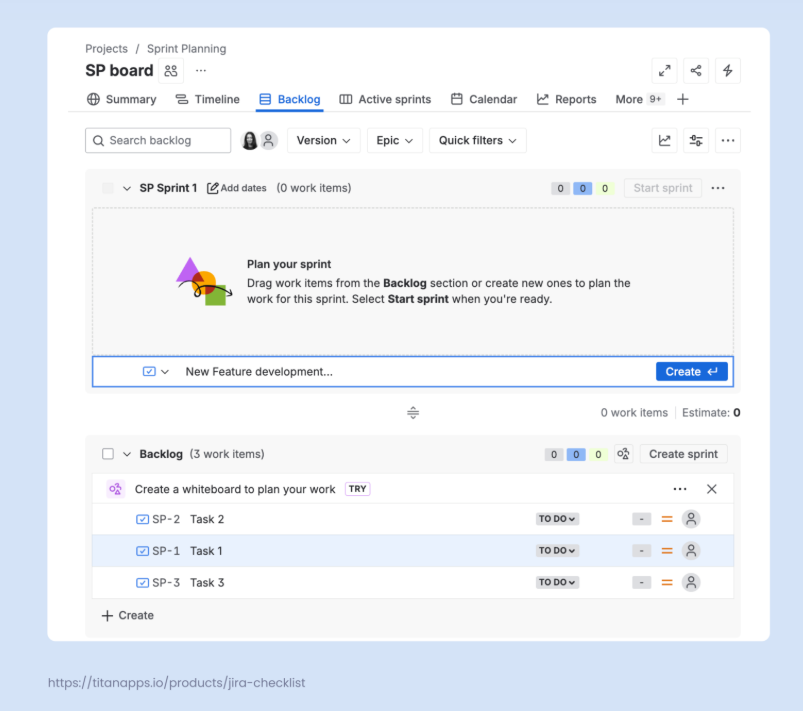
Each upcoming Sprint needs to be filled with work items (Jira issues) that cover necessary stories and functionalities crucial to a successful release. That’s when the whole Agile Sprint planning process takes place.

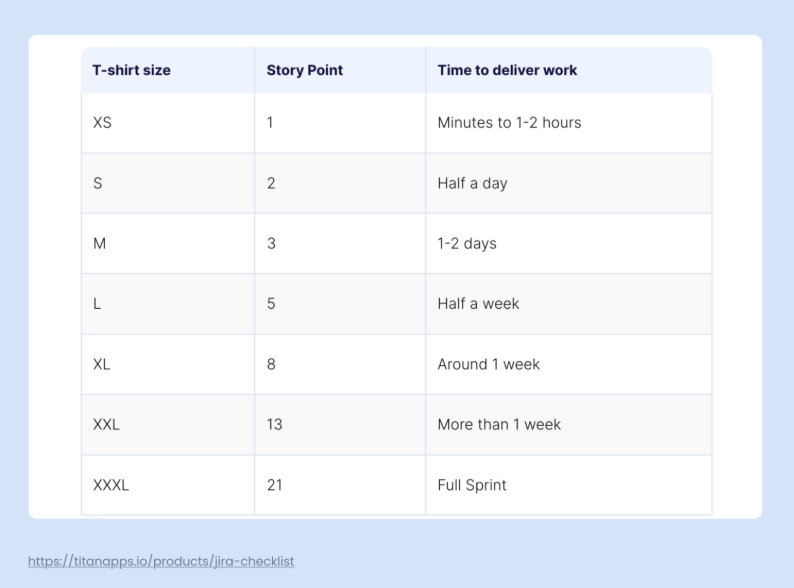
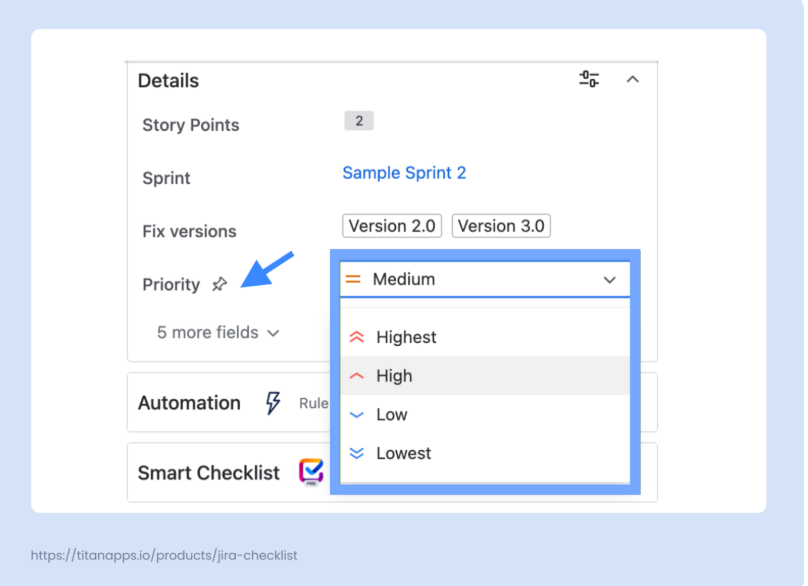
The Scrum Team needs to meet and decide which tasks have to be completed during the sprint. It is important to plan your backlog according to your team’s velocity and capacity and target the workload to reach the Sprint Goal. Therefore, it’s necessary for the PO to refine the backlog before the Sprint Planning Meeting. Story Points in Jira work items (issues) will be of great help in this regard, as they allow you to evaluate the complexity of each story.

Pro Tip

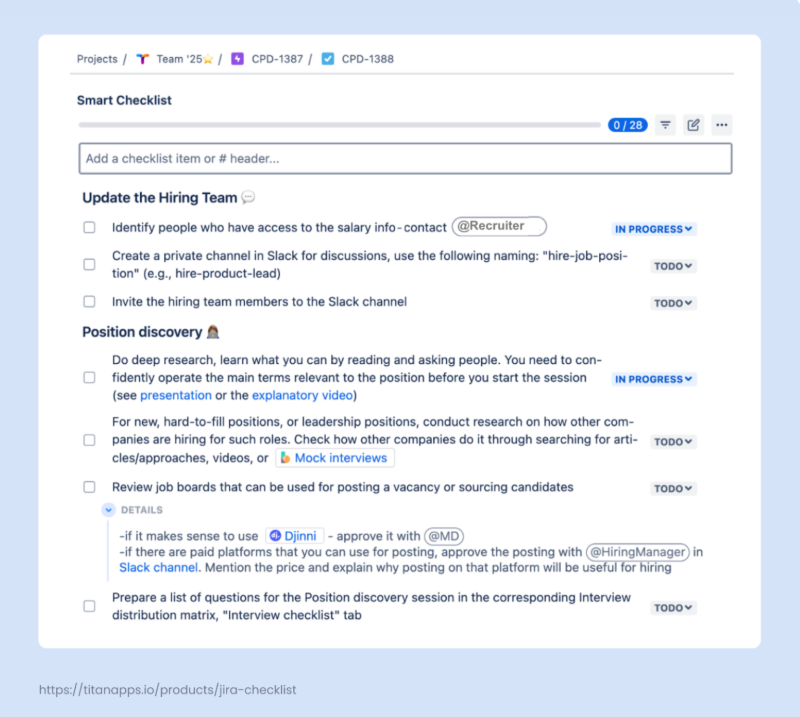
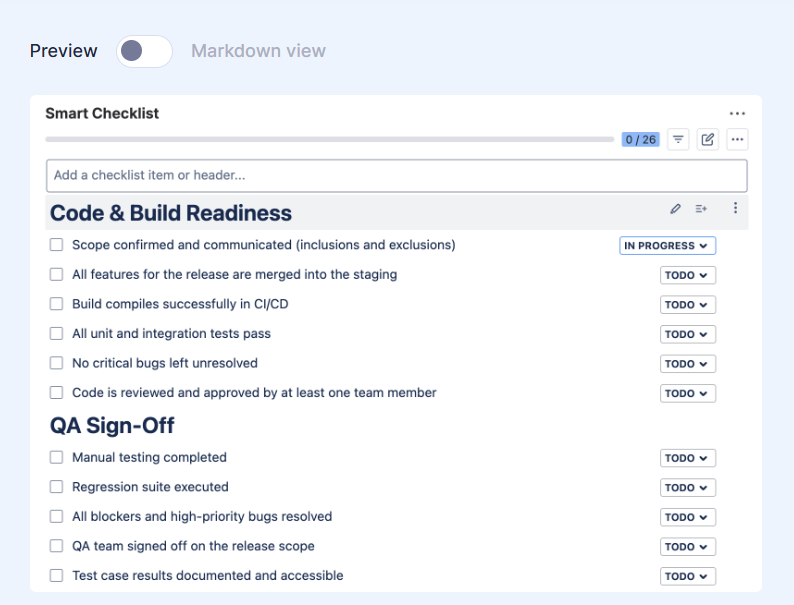
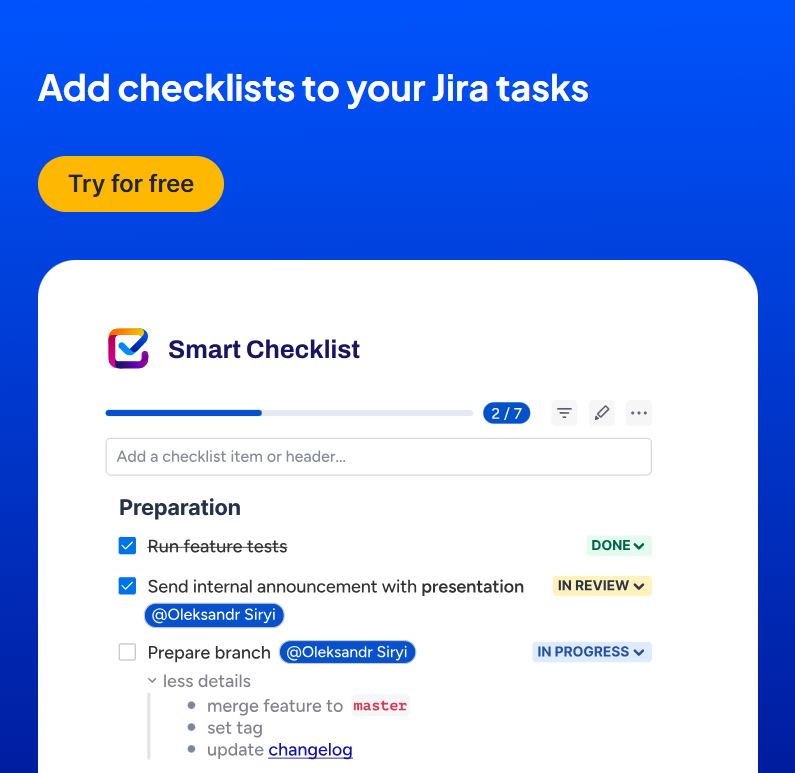
To streamline your work, we also recommend managing the Definition of Done in Jira. This acts like a contract between the Product Owner and the team. It clearly defines what the PO’s expectations are and what the team is supposed to deliver. You can even automate this process by applying the Definition of Done to stories automatically using a checklist template.

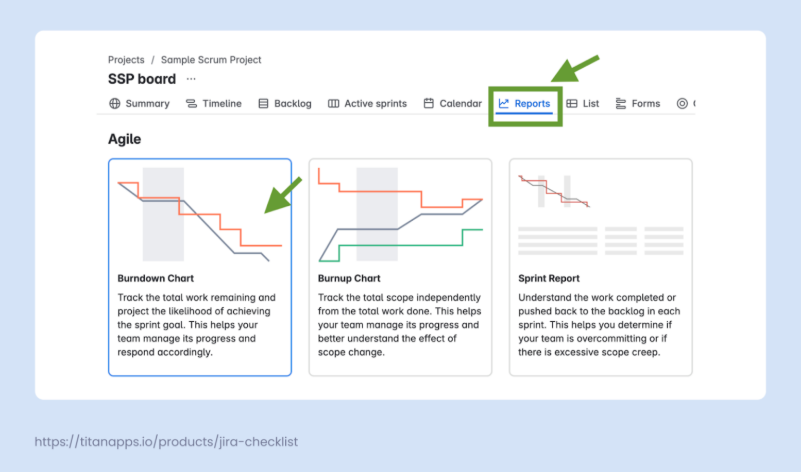
Additionally, remember to break work into smaller sub-tasks. Otherwise, instead of maintaining a steady pace on your burndown chart, you may observe huge drops in your sprint reports.

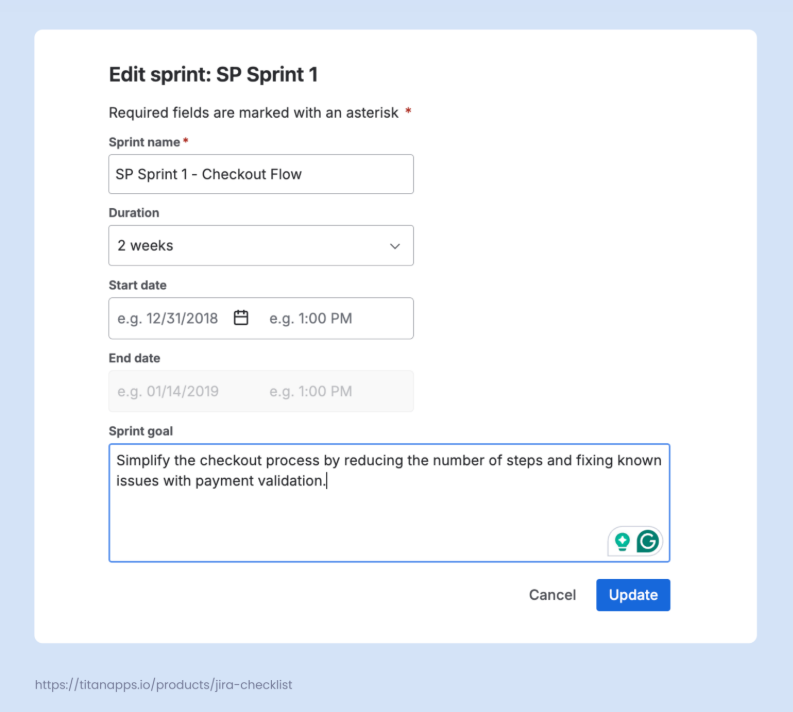
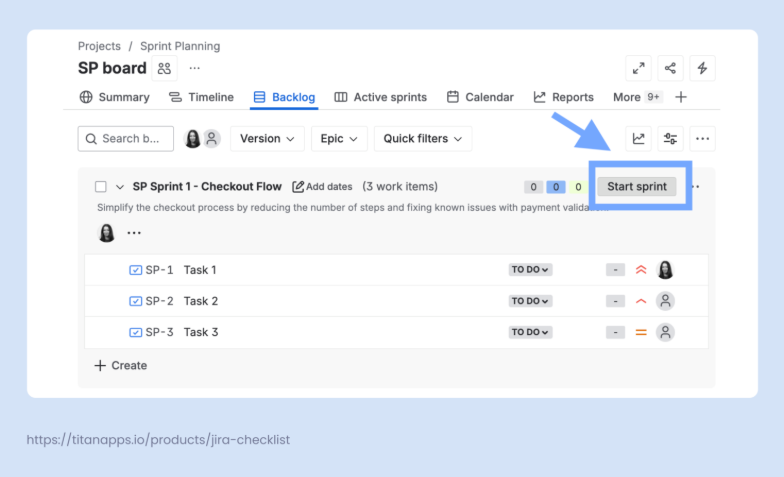
Create a Sprint in Jira

  1. In your scrum project in Jira, open the Backlog view. There, you will see a placeholder for your first sprint.
  2. Name your sprint and add the start date and the end date (optional).
  3. You can also select the sprint duration. This can be anywhere from 1 to 4 weeks or a custom duration.
  4. Add the sprint goal (optional). Here, you can briefly describe the primary focus of this sprint and what the end result should look like.

Add Work Items to Your New Sprint

This can be done from the Backlog view as well: simply drag and drop the backlog items you need into the sprint scope. You can add existing work items or create new ones and then include them in the current Sprint. Another option is to update the Sprint field directly on a work item view page.

Remember that one work item can’t be in more than one sprint at a time.

Unlike the Kanban board that supports a continuous flow of tasks, your Scrum board will only display the tickets from the active sprint. This setup helps the team to maintain focus and prioritize their work correctly.

Use Story Points to Make Your Jira Sprint Planning More Agile

Story points are used to estimate how much time a task will take. When estimating, the scrum team takes into account task difficulty, size, and complexity. 

For example, “Publish 50 landing pages” isn’t a complex task, but as there are a lot of landing pages, the task is large and can require significant time. Conversely, a task like “Fix the checkout bug” may be small, but it’s complex, so it will also require significant time. By examining various aspects of each task, your team can determine how long it will take to complete it.

A task that requires less than two hours is a one-story-point task. Three story points correspond to 1-2 days, while 21 story points correspond to a full sprint. As an alternative to this system, some teams use the T-shirt size scale. The XS size corresponds to 1 story point, S – two, and so on. You can select the scale that your team feels most comfortable with. 

Here is an estimation comparison table:  

Jira work items have a special field, Story points, where you can enter this information. Using estimations allows you to plan work more effectively and set realistic goals for the sprint scope.

Set the Ticket Prioritization Levels

Another important element of Jira sprint planning is ticket prioritization. Jira’s default priority levels are: Highest, High, Medium, Low, and Lowest. You can set the priority in the work item view tab or on most other tabs that list work items, such as Backlog or Active Sprints. 

Each level has a designated pictogram, enabling your team to quickly identify the most important tasks on your Jira board. Additionally, the board can be configured to display the highest-priority tickets first and the lowest-priority tickets last. 

Jira doesn’t limit you to the default priority levels: you can use the same field for your custom priorities. For instance, consider the MoSCoW framework, which categorizes tasks as Must Have, Should Have, Could Have, and Won’t Have. 

Task prioritization is an essential part of agile project management. It helps your team maintain focus and plan individual workloads according to the sprint goals.

Let the Sprint Begin

You can start your sprint as soon as everything is planned out and you’re done adding work for your team. Simply go to your Backlog in Jira, find your planned sprint, and click Start Sprint.

Keep Track of Your Team’s Progress

By all means, starting a sprint is not where your work ends. If you are a Scrum Master, Project Manager, or Product Owner, you will most likely want (and need) to track the progress of your team’s work.

Note

The best way to monitor progress is to run daily scrum meetings – stand-ups. They will provide your team with a shared space for catching up, discussing next steps, and coordinating group effort. They also help resolve blockers and align dependencies, allowing the team to be proactive through communication.

You may also want to pay attention to how much time your team devotes to their tasks, whether they complete them too early, and whether they miss their deadlines.

Check the Reports tab of your scrum project for detailed information about team velocity and sprint progress. There, you will find reports such as the Burndown chart, Burnup chart, Sprint report, and others.

In addition to Jira’s native reporting, you can set up a more insight-rich solution with the Smart Productivity & Team Activity Dashboard by Titan Apps. This tool gathers data not only from Jira but also from Confluence and GitHub, and visualizes it in a single view in near real-time. This allows you to track key productivity metrics and individual and team performance.

In this dashboard, you can find valuable information, such as:

  • The number of work items created and closed by assignees
  • The number of commits and pull request data
  • Productivity medians by team
  • Individual results by project, sprint, epic, and work item type
  • The correlation between individual results and the median for the person’s role

All of this is crucial for better understanding team capacity and velocity and preventing bottlenecks.

Pro Tip: Add Smart Checklists to Your Tasks

It’s possible to track progress even more closely. If your team is working on a high-priority task involving multiple steps, you can use Smart Checklist for Jira. It allows you to create feature-rich checklists directly in your Jira work items. Then, you will be able to view progress step by step. This improves transparency and helps your team be more aligned.

With Smart Checklist, you can set custom workflow statuses for each step, tag responsible teammates, add deadlines, include links to useful resources, add extra details in expandable fields, use headers, and more.

Note

More importantly, Smart Checklist enables you to create reusable checklist templates. This is very helpful for recurring tasks and processes. You can describe the step-by-step flow once and then reuse it multiple times, saving time and promoting consistency.

Here’s an example of such a checklist template for the hiring process. It outlines the necessary steps in granular detail, with all the relevant links and additional information. When the organization needs to launch the hiring process for a new position, the hiring team can simply reuse this plan in a new work item. 

Here’s another example: a pre-production readiness checklist. It covers the key steps that help you check if everything is ready for a release. Thanks to such a checklist template, you can be certain that nothing is missing.

Smart Checklist can be useful for many other agile processes and tasks that involve multiple steps or contain standard criteria. To start using checklist templates, install Smart Checklist for Jira from the Atlassian Marketplace.

Close a Completed Sprint

So, two weeks have passed, and you have reached the end of your Sprint. Now, it’s time to close it.

  1. Go to your Active sprints in your Jira Scrum board.
  2. If you have many active sprints, you will need to find the one you want to close.
  3. Select your sprint and click the Complete Sprint button. 
  4. If there are any work items that are not done yet, they can be moved back to the Backlog or a new sprint.

After closing a sprint, run a sprint retrospective meeting with the team. Such meetings, also known as retros, are great opportunities for scrum teams to evaluate their work and create a plan for what to improve in future sprints.

Are There Any Templates for Jira Sprint Planning?

Getting ready for sprints can feel tricky at first. Therefore, it’s natural to seek tools that can assist you with this, such as checklists and Jira templates. 

The native options range from a simple Confluence document to a whole pre-configured project setup. In addition, there are some third-party options. They can come in various forms and shapes, reflecting different approaches to the Jira sprint planning process. The examples vary from an Excel file listing the preparation steps to a Miro board that integrates with Jira.

Note

You can also prepare a Jira Sprint Planning template with the help of Smart Checklist for Jira. It allows you to create a structured plan of all the things you need to check and arrange, and ensure that nothing is missing. This can be valuable if you are new to the process or haven’t worked with agile frameworks before.


Let's keep in touch!

Stay updated with my latest posts and news. I share insights, updates, and exclusive content.

Unsubscribe anytime. By subscribing, you share your email with @viktoriiagolovtseva and accept our Terms & Privacy.

Give a Pawfive to this post!


Only registered users can post comments. Please, login or signup.

Start writing about what excites you in tech — connect with developers, grow your voice, and get rewarded.

Join other developers and claim your FAUN.dev() account now!

Avatar

Viktoriia Golovtseva

@viktoriiagolovtseva
Experienced Content Writer & Marketer, passionate about crafting strategic content that drives results and exploring the intersections of content and product marketing to create impactful campaigns.
Developer Influence
55

Influence

5k

Total Hits

32

Posts